RECORDING YOUR OWN VOICE

Being able to record your own voice is an important skill to have. Once you learn you can broadcast your own beautiful voice to the world. So get find yourself a microphone so you can get started!
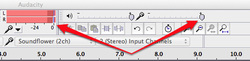
STEP 1-Confirm connection. Check to make sure your outputs and inputs are properly routed by first selecting Start Monitoring from the popup menu below the input meters (by the microphone icon), then playing your instrument.
- The LR input meters should respond.
- If the meters are hitting 0dB, use the Input Volume Sider to lower the input level so that the meters only approach 0 during the loudest sections.
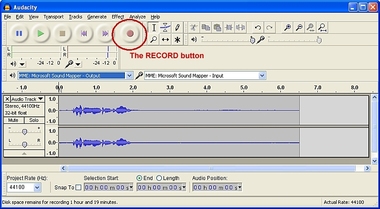
STEP 2-Record your track. Whichever method you choose, it’s now the moment of truth! Press the red Record button (or press “R”, and when you’re ready, start playing. You’ll see the waveforms written to your track as you play.
Note: While this should not generally be the case, if everything is set as described above, if you are flat-lining (i.e., the waveform displays as a straight line) when you record, that means that signal is not getting from your instrument to your track. Confirm your connections and try again.
Note: While this should not generally be the case, if everything is set as described above, if you are flat-lining (i.e., the waveform displays as a straight line) when you record, that means that signal is not getting from your instrument to your track. Confirm your connections and try again.

Congratulations! If you see something similar to this then you have successfully recorded yourself . You are now ready to move onto the next section of the tutorial. If you had some difficulty following the pictures and text, below is a video to help you out.
